A Thanksgiving Eye Makeup Tutorial for Those Who Aren’t Afraid to Be Extra
November 10, 2020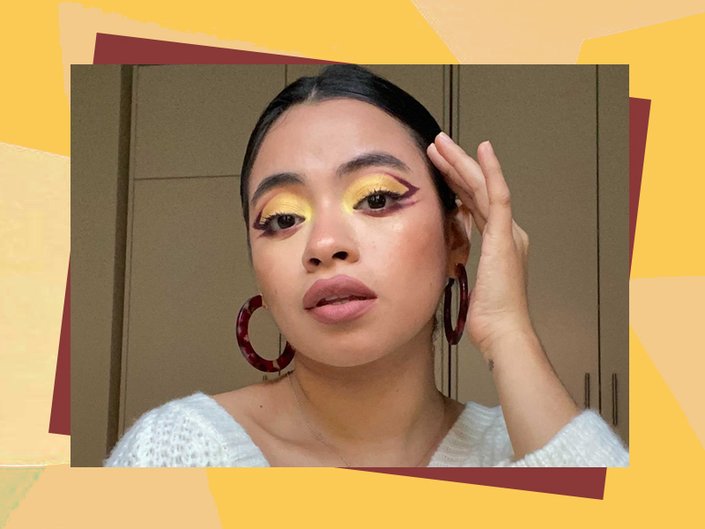
-
STEP 1:
Create the Cut Crease
Using the Urban Decay Eyeshadow Primer Potion in Freebase, I created the shape of my cut crease to act as a guide for where the gold shadow would go. I started in the inner corner of my eye, slightly above my crease and then followed the shape of my crease until I got to the outer corner. Then, I flicked the end out like a wing and connected it to my upper lash line. Finally, I filled in the inside of the cut crease space with the primer.
-
STEP 2:
Apply Gold Eyeshadow
Next, using a flat eyeshadow brush, I packed the shade Hot Spot from the Hipdot x Tapatio La Diabla Palette on top of the primer. While the shadows from this palette are very pigmented, I layered the eyeshadow so that the gold yellow color would appear very opaque.
-
STEP 3:
Outline the Gold Cut Crease
To finish up the eyelids, I used the L’Oréal Paris Matte Signature Liquid Dip Eyeliner in Burgundy to outline the outer portion of my cut crease. I started by lining my upper lash line and then created a wing that followed the outside of the cut crease. Once I got to the edge, I outlined the top part of the cut crease but only focused on the outer corner. Then, using a fine-tip pencil eyeshadow brush, I blended the burgundy eyeliner to outline the remaining top part of the cut crease. Blending out the eyeliner with the eyeshadow brush helps create a softer outline.
-
STEP 4:
Finish the Lash Line
Finally, I finished off the look by applying the burgundy shade Rendezvous from the Urban Decay On the Run Mini Palette in Shortcut all over my lower lash line. To create the bottom wing, I used the same liquid eyeliner from before but then blended it out using a fine-tip brush so that there weren’t any harsh lines.
![]()








.jpg?cx=0.5&cy=0.5&cw=150&ch=120&blr=False&hash=27326E4FE66B0A2BFABAF4995DA29DC5)



.jpg?w=705&h=1058&hash=AFC3731BAF52A253346A85D6F4BCA23A)