


.jpg?cx=0.5&cy=0.5&cw=150&ch=120&blr=False&hash=13DE8EDEE0E1AF98CC5D704B05EC64EE)


Gel Manicure: What Is It & How To Get The Look
April 30, 2024

In the world of nail art, gel manicures stand out as a popular choice for their durability and glossy finish. Unlike traditional nail polishes, gel manicures involve the application of a special polish that is cured under ultraviolet (UV) light, resulting in a longer-lasting, chip-resistant manicure that can endure everyday wear and tear. With various techniques and styles available, from classic solid colors to intricate designs, gel manicures offer endless possibilities for self-expression and achieving salon-quality nails at home or in professional settings. In this comprehensive guide, we will delve into the world of gel manicures, exploring different types, providing step-by-step instructions for DIY application, offering tips for proper removal, and sharing essential maintenance secrets to keep your gel manicure looking fabulous.
Different Types of Gel Manicures
The world of gel manicures offers a diverse range of options to suit different preferences and nail care needs. Each type of gel manicure possesses unique characteristics and application techniques, catering to various lifestyles and desired results.
1. Soaking Gel:
Soaking gel, also known as soft gel, is a popular choice for those seeking a long-lasting manicure without the commitment of hard gel. It derives its name from the removal process, which involves soaking the nails in acetone to gently dissolve the gel. Soaking gel offers a flexible and natural feel, making it suitable for individuals who engage in activities requiring frequent hand movement or prefer a more flexible manicure.
2. No-Light Gel:
No-light gel, also referred to as air-cure gel, stands out for its ability to cure without exposure to UV light. This unique feature makes it an ideal option for individuals who may be sensitive to UV light or lack access to a UV lamp. No-light gel provides a durable and glossy finish, similar to traditional gel manicures, without the need for specialized equipment.
3. Polygel:
Polygel, a blend of acrylic and gel, has gained popularity for its exceptional strength and durability. It is renowned for its ability to withstand wear and tear, making it suitable for individuals who engage in rigorous activities or desire a long-lasting manicure. Polygel offers a sculpting experience, allowing nail technicians to create various nail shapes and designs with ease.
4. Dip Gel:
Dip gel, also known as SNS (Signature Nail System), involves dipping the nails into colored powder after applying a base coat and activator. This innovative technique results in a chip-resistant and long-lasting manicure. Dip gel is known for its ease of application, making it a popular choice for both professional nail technicians and DIY enthusiasts seeking salon-quality results at home.
How to Get a Gel Manicure at Home
Getting a salon-quality gel manicure at home is easier than you think. With the right tools and a bit of practice, you can achieve a glossy, long-lasting manicure that rivals that of a professional. Here's a step-by-step guide to help you get started:
1. Gather your supplies:
-
UV/LED lamp
-
Gel base coat
-
Gel polish of your choice
-
Gel top coat
-
Nail file and buffer
-
Cuticle oil
-
Lint-free wipes
-
Acetone
-
Cotton balls or pads
-
Orangewood stick or cuticle pusher
2. Prep your nails:
Trim, file, and shape your nails to your desired length and shape. - Gently buff the surface of your nails to remove any shine or ridges. - Push back your cuticles using an orangewood stick or cuticle pusher. - Wipe your nails with a lint-free wipe dampened with acetone to remove any dust or residue.
3. Apply the base coat:
Apply a thin layer of gel base coat to each nail. - Cure under the UV/LED lamp for the recommended time specified by the product instructions.
4. Apply the gel polish:
Apply a thin layer of your chosen gel polish to each nail. - Cure under the UV/LED lamp for the recommended time. - Repeat this step for a second coat of gel polish for a more opaque color.
5. Apply the top coat:
Apply a thin layer of gel top coat to each nail. - Cure under the UV/LED lamp for the recommended time.
6. Finish and moisturize:
Use a cotton pad or ball dampened with acetone to clean up any smudges or excess polish around the edges of your nails. - Apply cuticle oil to your nails and cuticles to nourish and hydrate them.
Remember, practice makes perfect! With time and experience, you'll be able to achieve salon-quality gel manicures at home like a pro.
How to Get Your Gel Manicure to Last Longer
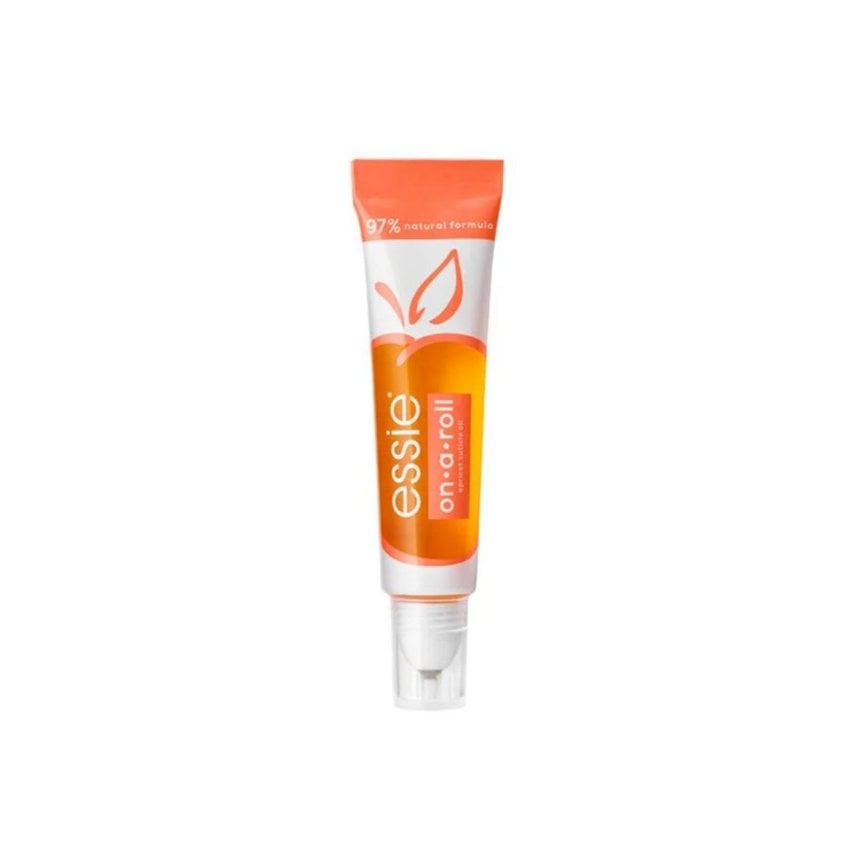
1. Use cuticle oil regularly:
If you want to make your gel manicure last longer, be sure to use cuticle oil regularly. Apply it to your cuticles at least once a day, and more often if your cuticles are dry or cracked. You can also apply cuticle oil to your nails before you apply your gel polish, as this can help to create a smooth, even surface for the polish to adhere to. Using cuticle oil is a simple and effective way to help your gel manicure last longer. By keeping your cuticles and nails healthy, you can reduce the risk of damage and keep your manicure looking its best for longer. Here’s one of our favorite cuticle oils to use:
Essie’sOn a Roll Apricot Nail & Cuticle Oil
2. Apply thin coats:
When applying the gel polish, be sure to apply it in thin coats. If you apply the polish too thickly, it is more likely to chip. Apply each coat in a thin, even layer and allow it to cure completely under a UV or LED light for the recommended amount of time. Curing the polish properly is essential for preventing it from chipping.
3. Wear gloves when washing the dishes: This will help to protect your nails from harsh chemicals and abrasives that can damage the gel polish
How to Remove a Gel Manicure
To remove a gel manicure, you will need acetone nail polish remover, cotton balls or pads, aluminum foil, an orange stick or cuticle pusher, a nail file, and a buffer.
Start by filing the top coat of your gel manicure to break the seal. Be careful not to file your natural nails. Next, soak a cotton ball or pad in acetone nail polish remover and place it on each nail. Wrap each nail in aluminum foil to hold the cotton ball or pad in place.
Wait for about 10-15 minutes, or until the gel polish starts to lift and peel. Once the gel polish is loose, gently scrape it off with an orange stick or cuticle pusher. Be careful not to damage your natural nails.
After you have removed all of the gel polish, wash your hands with soap and water. Then, use a nail file to smooth out any rough edges. Finally, apply a cuticle oil to your nails and cuticles to help them heal.
What to Do if Your Gel Manicure Chips?
We tapped Evelyn Lim, chief educator at NYC-based nail salon Paintbox, for her insight on making gel manicures last as long as humanly possible.
When you get a crack or lift in your gel manicure, it’s almost instinctual to reach for a top coat to attempt to cure it back in its place. This is the number-one thing not to do, says Lim. “While applying top coat over gel will not damage the nail, it may trap bacteria if not thoroughly prepped and cleansed before application,” she explains.
If you do run into an issue with your gel polish (whether it's cracked or lifting), it’s best to go back to your nail technician, so it can be completely removed then reapplied. “If you only have a snag or a small chip on the edge, try smoothing it out with a file, so it doesn't catch on anything,” says Lim. Otherwise, leave it alone until you’re ready to head back to your salon.